
I was recently tasked with finding a solution to migrate the Application Logs of an EC2 instance to CloudWatch, then export the logs to S3 using automation. In order to make this walk-through “short” and easy to read, I have divided it into two articles.
- Export Windows EC2 logs to CloudWatch.
- Export CloudWatch Logs to S3 Using Lambda.
In this article we will go through the process of setting up the services to export the Logs from an EC2 Instance to CloudWatch. The same steps can be applied to export logs from a Linux EC2 instance.
This solution can be implemented across a fleet of EC2 instances by utilizing SSM and Parameter Store. In order to accomplish this task; while adhering to AWS best practices, we need to implement the following:
- Create/Edit the IAM Roles for both the Administration and Target instance(s).
- Create the Administration Instance and the Target Instance(s) if you don’t have that setup yet.
- Create the CloudWatch Log Group and Log Stream.
- Install the CloudWatch Agent.
- Configure the CloudWatch Agent.
The Administration Instance is where you will configure the CloudWatch Agent. During the setup process, you will have the option to store the configuration file in SSM Parameter Store. This allows you to deploy the configuration file across a fleet of Target EC2 Instances simultaneously.
IAM Roles & Permissions
Following the AWS best practices, we will create two IAM Roles. The Admin server role ‘CloudWatchAdminServerRole’ that we will attach to the Administration EC2 Instance, and the Target server role ‘CloudWatchTargetServerRole’ that we will attach to our current and any future Target EC2 Instance(s).
To create the IAM Roles, follow the steps below:
- Navigate to the IAM Section, go to Roles and click Create Role.
- Choose EC2 as the Service that will use this role and then go to Permissions.
- Select the policies ‘CloudWatchAgentAdminPolicy’ and ‘AmazonSSMManagedInstanceCore’.
- Enter the role name ‘CloudWatchAdminServerRole’ and the description, then Create Role.

As for the Target Server(s) Role, repeat steps 1 through 3; however, this time attach the policies ‘CloudWatchAgentServerPolicy’ and ‘AmazonSSMManagedInstanceCore’, then enter the role name ‘CloudWatchTargetServerRole’ and the description.

Note: To use these policies to write the agent configuration file to the Parameter Store and then download it from the Parameter Store, your agent configuration file must have a name that starts with AmazonCloudWatch-. If you have a CloudWatch agent configuration file with a file name that doesn’t start with AmazonCloudWatch-, these policies can’t be used to write the file to Parameter Store or to download the file from Parameter Store. [Source]
Create the Log Group and Log Stream
I have chosen not to create a Log Group or a Log Stream because while configuring the CloudWatch Agent; if you specify a log group or stream that doesn’t already exist, CloudWatch will automatically create it for you. You can define a log stream name using a literal string, the predefined variables {instance_id}, {hostname}, and {ip_address}, or a combination of these.
To create a new Log Group, go to the CloudWatch Console > Logs Groups > Actions > Create Log Group.
To create a Log Stream, navigate to the newly created Log Group and click on Create Log Stream.
Download and Install the CloudWatch Agent on the Instances
In this step we will install the CloudWatch Agent on the instances. But before you start, make sure that the IAM Role ‘CloudWatchAdminServerRole’ is attached to the Administration EC2 Instance, and that the IAM Role ‘CloudWatchTargetServerRole’ is attached to the current and any future Target EC2 Instance(s).
Installing the CloudWatch Agent can be done through the AWS Console or by SSH (Linux) or RDP (Windows). In this example, I will be utilizing the AWS SSM service.
From the AWS Console navigate to Systems Manager then to the Run Command page. With Run Command, you will be able to target all your instances all at the same time instead of targeting them individually.
From the Run Command page, click on the Run Command button and under the Command Document Section, look for the command document ‘AWS-ConfigureAWSPackage’.

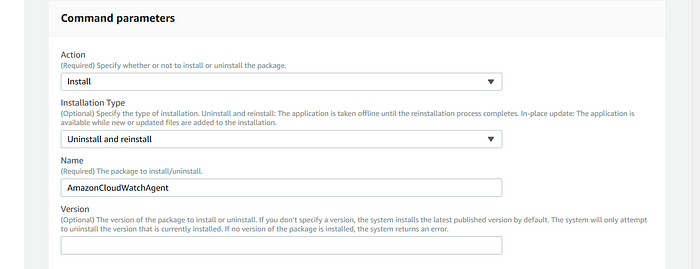
Under the Command Parameters section, you will need to choose:
- Action: Install
- Installation Type: Uninstall & Reinstall
- Name: AmazonCloudWatchAgent
- Version (Optional): if left blank, AWS will install the latest published version by default.
Under the Targets Section, you will choose the instance(s) on which you will install the CloudWatch Agent. Keep in mind that it may take some time for the Instances to show up after attaching the necessary IAM roles.
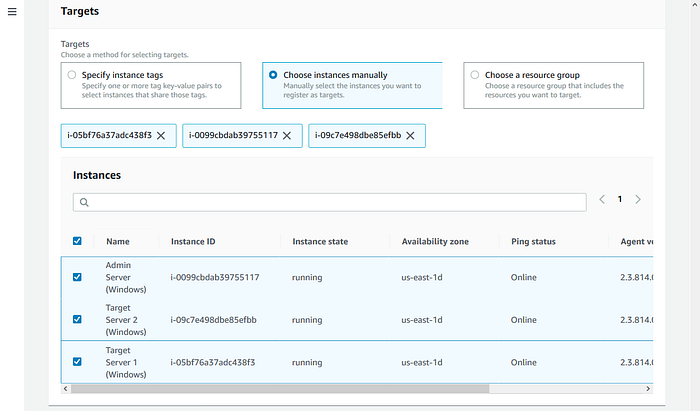
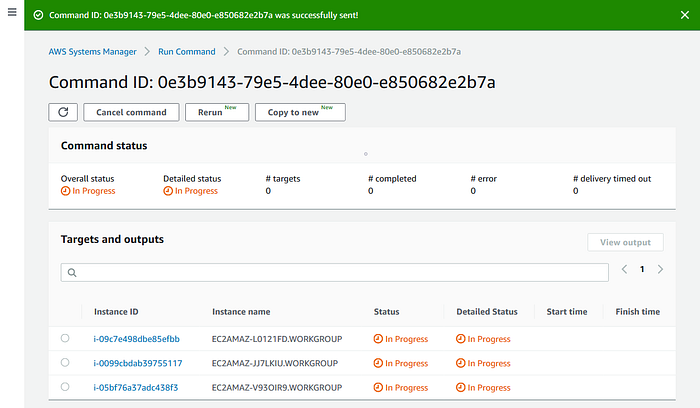
You could configure everything else (Other parameters, Rate Control, etc.) based on your task’s requirements. Once you click Run, AWS SSM will start installing the CloudWatch Agent on all servers automatically.
Configure the CloudWatch Agent on the Administration Server
Now that we’ve installed the CloudWatch Agent on each of the instances. We can go ahead and configure it on the Administration Server. In order to do this, you will need to login to the Administration Server (RDP or SSH). To start the CloudWatch Agent Configuration Wizard:
Powershell:
# cd "C:\Program Files\Amazon\AmazonCloudWatchAgent"# .\amazon-cloudwatch-agent-config-wizard.exe
Linux CLI:
# sudo /opt/aws/amazon-cloudwatch-agent/bin/amazon-cloudwatch-agent-config-wizardNote: You may run into issues with the collectd and the CloudWatch Agent configuration. The collectd software is not installed automatically on every server. You can edit the configuration file from the Parameter Store and remove the Colletd portion. [Source]
Follow the prompt to setup the configuration file for your server. During the setup process you can specify whether you want to store the configuration file in the Parameter Store or not. Storing the file in Parameter Store will allow me to deploy the same configuration across a fleet of Target Instances. You could also run the commands below against this sample template:
Make sure you update the portion ‘ServerNameHere’ in the sample template.
Once you’ve configured the CloudWatch Agent, you will need to reload the configuration file by running the following commands:
Powershell:
# .\amazon-cloudwatch-agent-ctl.ps1 -a fetch-config -m ec2 -c file:config.json -s###
-a fetch-config causes the agent to load the latest version of the CloudWatch agent configuration file, and -s starts the agent.
Linux CLI:
# sudo /opt/aws/amazon-cloudwatch-agent/bin/amazon-cloudwatch-agent-ctl -a fetch-config -m ec2 -c file:config.json -s# sudo /opt/aws/amazon-cloudwatch-agent/bin/start-amazon-cloudwatch-agent
Keep in mind that you have to specify the correct log file locations as the locations and naming differ from one Linux system to another. You could also use this basic configuration found here:
Note: If you’re storing the configuration file locally, the configuration file config.json is stored in C:\Program Files\Amazon\AmazonCloudWatchAgent on Windows Server. You can then copy this file to other servers where you want to install the agent.
If you’re going to use Systems Manager to install and configure the agent, be sure to answer Yes when prompted whether to store the file in the Systems Manager Parameter Store. You can also choose to store the file in the Parameter Store even if you aren’t using the SSM Agent to install the CloudWatch agent. To be able to store the file in the Parameter Store, you must use an IAM role with sufficient permissions.
Configure the CloudWatch Agent on the Target Server(s)
Now that we’ve generated the configuration file, we can deploy (No need to RDP or SSH) it across multiple EC2 Target Instances via SSM. Go to the SSM Console then navigate to Run Command and click on the Run Command button.
In the Command Document Section, select the document ‘AmazonCloudWatch-ManageAgent’.
Under the Command Parameters section, you will need to choose:
- Action: Configure
- Mode: EC2
- Optional Configuration Source: SSM
- Optional Configuration Location: Enter the Parameter Store Name you specified during the configuration of the CloudWatch Agent. This can also be found under the Parameter Store Section in the SSM Console.
- Optional Restart: Yes (loads the new configuration file).
Under the Targets Section, you will choose the Target Instance(s) you want to monitor to deploy the Configuration File to.
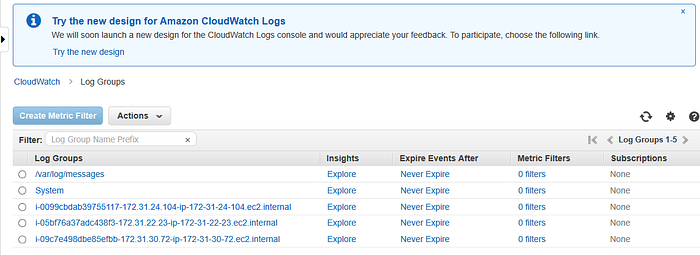
You may need to install the SSM It may take some time for the logs to generate in the AWS CloudWatch Console. However, you should see something similar to what’s in the screenshot below.
You have now configured your EC2 Instances to send logs to CloudWatch. In my next article, I will walk you through on how to push those logs on a daily basis from CloudWatch to S3.
If this article has helped you solve a problem, please consider sharing it and following me on Medium as I will be posting more articles in the future. Also, feel free to connect with me on LinkedIn.
Stay safe and thanks for coming by.